-

-
WARNING!
FOR YOUR OWN SAFETY, PLEASE READ THIS MANUAL CAREFULLY BEFORE OPERATING THIS VEHICLE. ONLY OPERATE THE VEHICLE UNTIL YOU HAVE COMPLETELY AWARE OF ADEQUATE KNOWLEDGE OF CONTROLS AND OPERATION FEATURE AND YOU HAVE BEEN TRAINING IN SAFE AND PROPER RIDING TECHNIQUES. PERIODIC INSPECTIONS, WELL MAINTENANCE AND GOOD RIDING SKILLS, WILL ENSURE YOUR SAFETY RIDING AND INCREASE THE PRODUCT RELIABILITY OF THIS VEHICLE.
01 USER INSTRUCTIONS
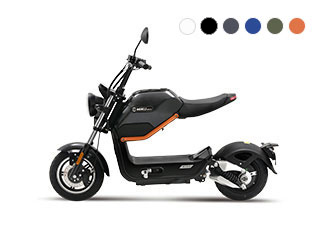
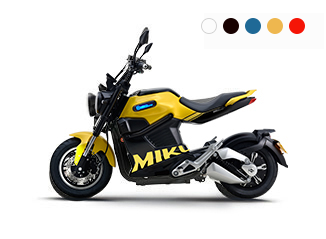
Thanks for your purchasing of this vehicle. This model is designed for safety, built for durability, and perfected for daily street use. The unique vehicle design, enrich of stylish and personality, represents your outstanding taste and favor to pursue the state of the art living attitude.
This manual describes the correct usage of this motorcycle including safety riding, simple inspection methods and so on. For a more comfortable and safety riding, please read this manual carefully before riding and make sure you are always following the requirements below:
-
Fully understand the information in this manual, including but not limited to the relevant instructions, precautions and warnings.
-
Fully understand the operation & contingency measures of electric scooters.
-
Be fully aware of warning labels of electric scooters.
-
Modifying the scooter and/or removing original equipment and/or safety decals could make this scooter unsafe for operation.
-
Please consult your dealer if you have any questions concerning this manual. Wish you safe and pleasant riding experience!
02 SAFETY INSTRUCTION
THE VEHICLE IS TWO WHEEL SINGLE TRACK VEHICLE. IN ORDER TO ENSURE THE SAFETY OF YOU AND OTHERS. TO REMIND OF OPERATOR, WHO SHOULD KNOW THE FOLLOWING REQUIREMENTS BEFORE RIDING. HE OR SHE SHOULD:
Driver
-
Well trained and familiar to all the aspects of vehicle operation.
-
Obtain qualified training & legal license for operation of this vehicle.
-
Well and professional maintenance service for operator and certificated repair shop/dealer to acquire good mechanical conditions of vehicle.
Safe Riding
-
Always pre-check your vehicle before riding is important to prevent an accident.
-
Please follow the maximum loads limited of operator and passenger.
-
Observe traffic regulations and traffic signs and confirm the surrounding road conditions and bike conditions at any time, so as to actively avoid danger.
Therefore
-
Driving after consuming alcohol or illegal drugs is strictly prohibited.
-
Always wear an approved helmet and protective clothing that cover your legs, ankles and feet.
-
Please DO NOT use high beam in good lighting conditions. The continuous use of high beam will cause the visual disturbance to vehicles & pedestrians on the opposite side, thus affecting normal driving.
-
Please do not make or answer any call during riding, which is likely to cause traffic accidents.
03 PERFORMANCE
The performance of an electric scooter is different from gasoline engine driven or human powered vehicles. It's very important to understand how the electric scooter MIKU Super works before riding.
|
Route |
 |
low Speed |
 |
High Speed |
 |
Fewer Stops |
 |
Stop & Go |
 |
Flat |
 |
Elevation Changes |
 |
Smooth Pavement |
 |
Soft Gravel |
|
Rider |
 |
Modulated Riding |
 |
Aggressive Riding |
 |
Streamlined |
 |
Fully Upright |
 |
Reduced Cargo |
 |
Heavier |
|
Weather |
 |
Warm Weather |
|
Cold Weather |
 |
No Wind |
 |
High Head Winds |
 |
Dry Roads |
 |
Slippery Roads |
|
Scooter |
 |
Inflated Tires |
 |
Underinflated Tires |
 |
Balanced Power Pack |
 |
Unbalanced Power Pack |
In practice, the range is largely influenced by the driver’s weight and the additional load, weather conditions, road conditions, the way it’s driven, the number of starts(e.g. on crossings), the condition of tires( especially their inflation), batteries wear and tear and many other factors. In extreme conditions, the range can be reduced to less than 50% of the indicated value.
IDEAL CONDITIONS
Flat terrain, constant speed, no full load, no headwind, correct tire pressure, driver weight<70kg, no payload, approx. 20℃ ambient temperature.
04 DESCRIPTION OF COMPONENTS & PARTS
Diagram of Components
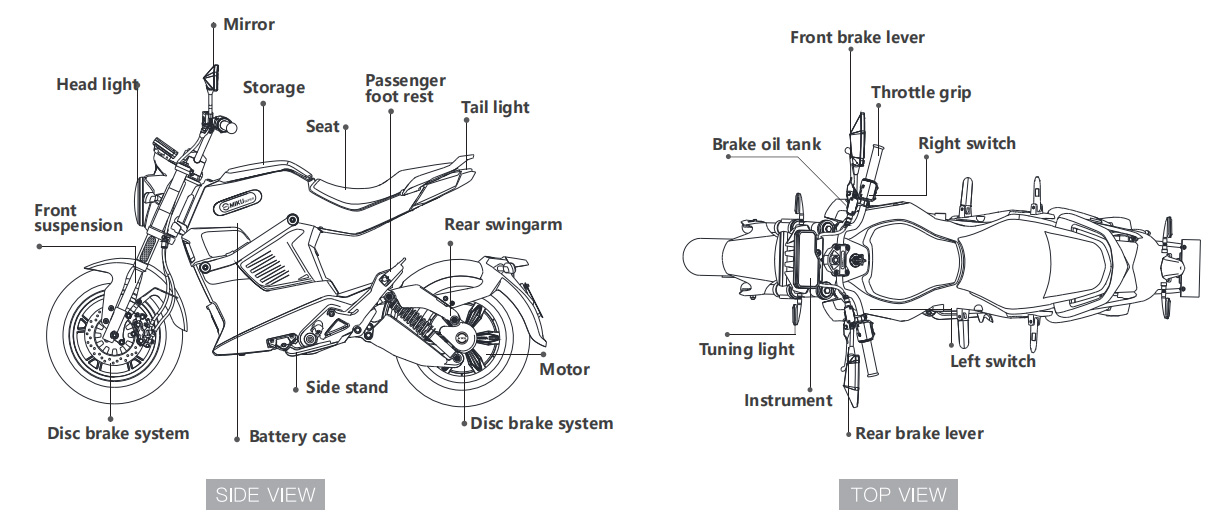
Diagram of Dashboard
Note: The following is MIKU Super smart version instrument.
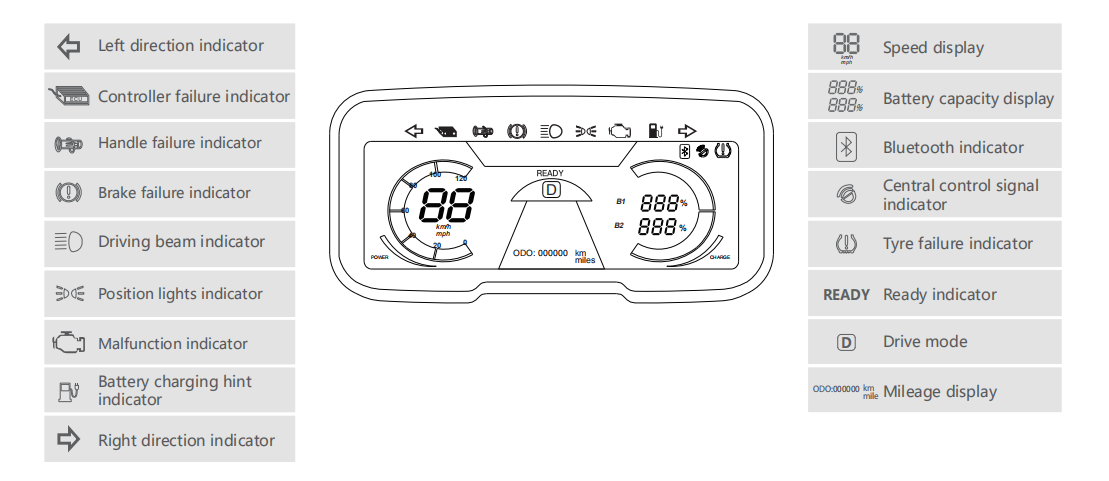
Speed display
The speed display shows the riding speed.
Battery capacity display
This indicator shows the remaining capacity of the battery.
Drive mode
Here shows the speed mode which you choose.
Mileage display
Switch on the ignition, the indicator first 10 seconds displays the total distance the scooter has been ridden in kilometers. And then display the distance of single riding in kilometers.
Left direction indicator
This indicator light flashes when the left turn signal light is activated.
Right direction indicator
This indicator light flashes when the right turn signal light is activated.
Driving beam indicator
Lights up whenever high beam is switched on.
05 RIDING GUIDE
Pre-ride Checklist
The condition of a vehicle is the owners’ responsibility. The operator should check the vehicle by simple but thorough inspection, to make sure of vehicle condition, quick inspect some key and important parts, to prevent the vehicle from serious consequence/accident. Please carefully check the following points before each ride.
-
-
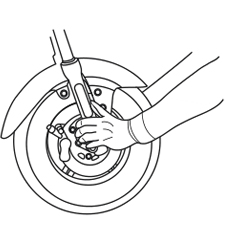
Tires
-
1Ensure that both tires have at least 1/8 inch tread depth at center.
2Both tires must be inflated to the pressure indicated on the tire sidewalls.
3Replace the tires if tread height is less than 1/8 inch at the center of tires.
-
-
Throttle
-
1Check for smooth operation. Make sure throttle grip could return to cut off power.
2Check for frayed cable or damaged cable housing. Replace damaged cable to avoid electricity shock.
3Check for mud, debris and ice in the throttle mechanism. Clean out any contamination.
-
-
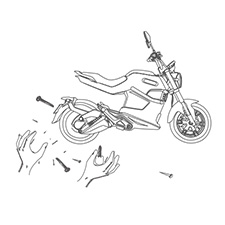
Fasteners
-
1Check that all axle nuts and lug nuts are secure.
2Check for missing fasteners. Replace as necessary.
3Check that all other fasteners are secure. Tighten as necessary.
-
-
Steering
-
1Make sure steering turns freely.
2Check for proper “toe-in” of wheels
3Lubricate/Adjust as necessary. Please refer to the maintenance section.
-
-
Chassis frameCheck for bent/damaged components. Replace as necessary.
-
-
Battery Check the power level to ensure it's enough for riding.
-
-
Lights Check for proper operation. Replace bulbs as necessary.
-
-
WARNING!
Always perform the entire pre-ride checklist before using the scooter as this can help you spot problems that could interfere with safe scooter operation. Failure to follow this entire checklist before every ride can cause serious injury, and/or property damage to yourself and/or others.
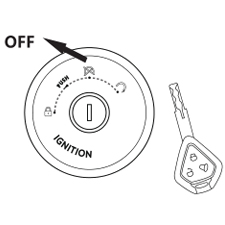
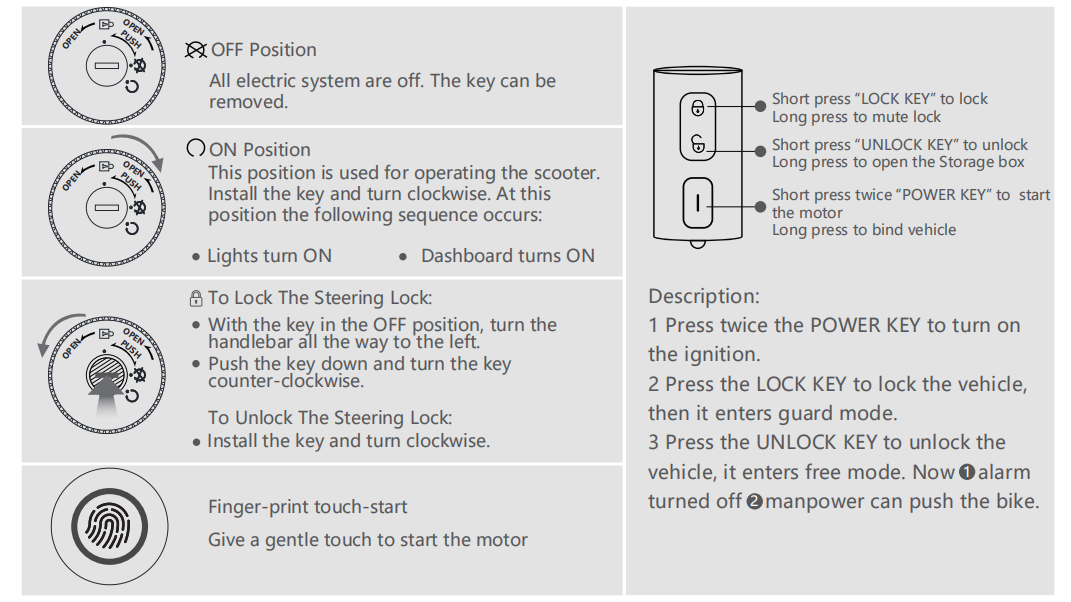
Ignition Switch
This switch controls the ignition, and also used to lock the steering. The various positions are described as below.
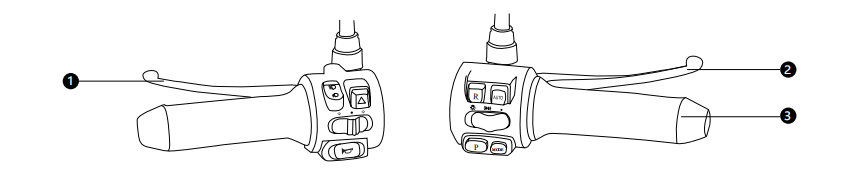
Brake Levers & Throttle
-
1Rear brake lever: When stopping the scooter, squeeze the left brake lever smoothly and firmly to engage the rear brake.Always engage the rear brake first.
-
2Front brake lever:Squeeze the right lever to engage the front brake. The right lever must be squeezed gently at first to avoid locking the front wheel.
-
3Throttle grip:The rotary throttle grip is on the right handlebar.Accelerate by rotating the throttle towards you. Decelerate by rotating the throttle away from you. The throttle includes a safety spring that snaps the throttle back to end when released.
-

-
DANGER!
Be extremely careful when engaging the front brake to avoid locking the front wheel. Locking the front wheel can cause a serious accident.
Left&Right Switch
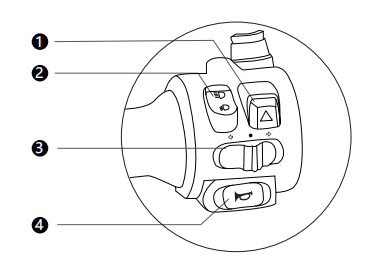 Left switch
-
1 Hazard warning lamp switch
-
2 High & low beam
-
3 Turn signal
-
4 Horn
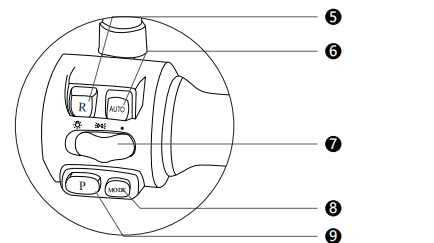 Right switch
-
5 Reverse
-
6 Auto Headlight
-
7 Headlight switch
-
8 3 speed control key :Ⅰ:ECO,Ⅱ:Normal,Ⅲ:Sport
-
9 Parking:
Parking: Switch on the ignition, the instrument displays P. Press P button to remove parking function, then start your ride.
During temporary stop, press P button to prevent accidents caused by misoperation.
Stopping the scooter
-
1Reduce the throttle to 0 position.
-
2 Operate the brakes.
-
3 After the vehicle is stopped turn off the ignition.
-
4 Lower the side/main stand with your foot while holding the motorcycle upright.Remove the key from the main switch.
-
-
DANGER! When braking, always engage the rear brake first to retain maximum control of the scooter. Wet, oily, or sandy roads reduce braking effectiveness. Hard braking on these surfaces could lead to loss of control and a serious accident. Always reduce speed as gradually as possible.
Storage box
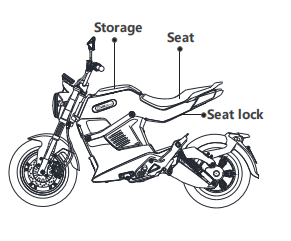
TO OPEN THE STORAGE BOX
-
After shutting off the e-bike, insert the key into the handlebar lock, and rotate it leftwards to open the storage box.
-
With the bike unlocked, long press the finger-print touch start to open the storage box.
-
Long press the alarm unlock key to open the storage box.
Seat
TO OPEN THE SEAT
-
Insert the key into the seat lock, and then turn the key clockwise to “OPEN” the seat.
-
Fold the seat up.
Motor safety
-
-
-
Keep the scooter free of dirt and debris,especially in the throttle linkage area.
-
-
-
Never tamper with, alter, or change the scooter motor settings. The motor governor is factory preset and protects the motor from damage. Excessive motor speed is potentially dangerous to the operator,and the motor itself.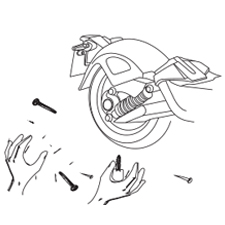
-
-
-
Never start the engine or motor unless you are property seated with your hands firmly on the controls. 
-
-
-
Operating the scooter in conditions where water,mud,snow, dirt sand or other debris can get into the throttle wire conduit and/or the throttle mechanism can cause the wire or throttle mechanism to bind, which may lead to throttle sticking,loss of control,and possible death,injury, and/or property damage. 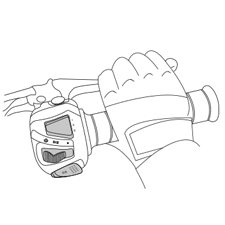
Fasteners
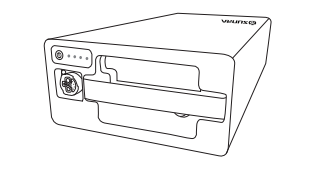
06 THE MANUAL OF SMART CHARGER
Instruction
-
1 The charger should be matched with the alternating voltage of local power supply before connecting charger.
-
2 The charger is designed and tested for original battery from manufacturer. Do not use them for the other mismatching batteries.
-
3 The charger is tested and matched with its scooter. If the charger is used on other scooters, it might make different charging effect and/or cause battery damage.
-
4 Please connect charger and scooter before connect to local power supply, while you are going to charge the battery. Please disconnect the charger from local power supply while the battery is fully charged. Don't disconnect charger and scooter while the charger is connected with local power supply for safety reason.
-
5 Do not violently shake the charger. It might cause damage of the charger.
-
6 Keep the charger away from any water, dust or high temperature.
-
7 The charger creates heat while working. It should be stored in well ventilated place and keep away from any inflammable things.
-
8 Keep it away from children.
-
9 If any wire or shell was broken, Please send it to the professional repairing service. Don't open or repair it yourself. This action will cause danger and lose warranty of the charger.
-
10 The charger is designed and made for electric scooter battery charging use. Don't make it for other use.
-
11 Any incorrect usage which does not follow this instruction will lose guarantee from seller.

Usage
-
a Turn the ignition off.
-
b bcdef Turn the ignition off. Plug the charge into the vehicle’s charging port.
-
c Plug the power plug into 110V/220V/250V local AC power supply.
-
d The green light turns to red to indicate charging status.
-
e After 6-8 hours charging, the red light turns to green to indicate the battery charging is finished.
-
f While the charging is finished, the charger will cut off power from AC power supply automatically.
07 BATTERY & CHARGING
MIKU Super holds 2 portable batteries located under the storage box . The battery could be charged in the
scooter or separately charged out of the scooter.
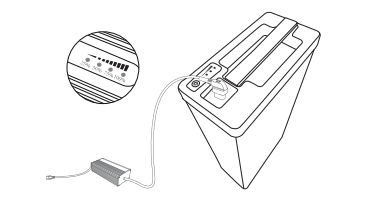 Charging on battery
-
Take out the power pack from the battery case;
-
Connect the charger plug to the charging socket on the battery;
-
The charging is in process if the charging indicators are on.
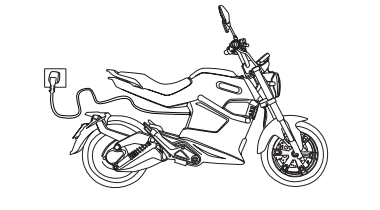 Charging on scooter
-
Connect the charger plug to the charging socket on the scooter;
-
The charging is in process if the red charging indicator on the charger are on.
Note : ①Always use a MIKU Super original battery charger from manufacturer. Improper charger might pose a fire or explosion risk. ②The battery is fully charged , while the state light on the charger turns green.
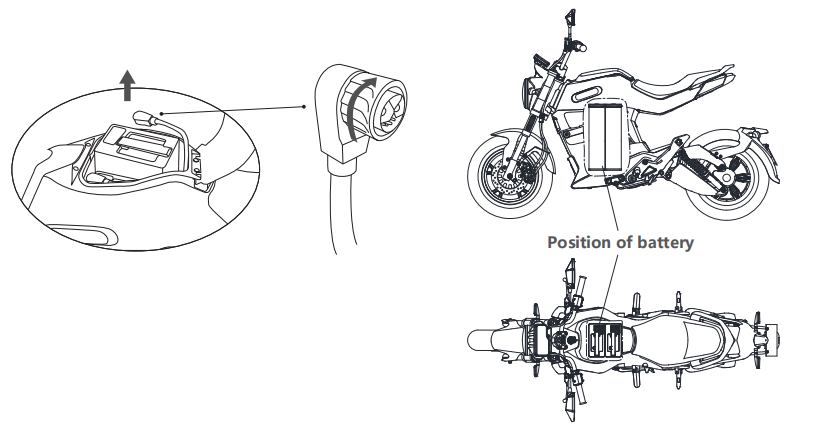 Take the Power pack out
-
1Open the storage box
-
2 With the key in the Steering Locked position, turn the key counter-clockwise, to open the battery case.
-
3 Rotate the blue knob to the left and hold it until you pull the plug off.
-
4Take the battery out.
Tip: A click should be heard while successfully plugging in power.
BATTERY POWER
INDICATOR INSTRUCTIONS
-
The power indicators show 5 levels of battery powe indicator show 20% of battery power.
-
The power indicators are blinking while the battery is under charging.
-
The power pack is fully charged while 5 power indicators are all staying on.
Store the Battery
-
If the vehicle will not be used for more than a month, fully charge it, and then place it in a cool, dry place.
-
If the battery will be stored for more than 2 months, check it at least once a month and fully charge it if the remaining capacity is less than 20%.
-
Fully charge the battery before the next time you ride it.
-
Please contact your dealer if you are not familiar with handling the battery.
-
Always keep the battery charged. Storing a discharged battery can cause permanent battery damage.
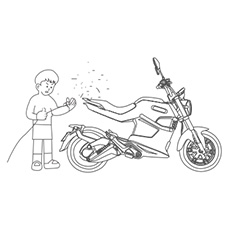
08 STORAGE
SHORT-TERM (FOR A FEW DAYS)
-
Always store your vehicle in a cool, dry place and, if necessary, protect it against dust with a vehicle cover.
-
Please store the vehicle in a air flow room with dry air if possible. A place with wet humidity will cause rust.
LONG-TERM ( FOR WEEKS)
-
Clean the vehicle.
-
Check and correct tire pressure and lift the vehicle off the ground, so that neither of the two wheels is on the ground. If this is not possible, turn the wheels every month a little further, so they do not constantly the same place standing.
-
If you are not using the vehicle for an extended period of time, set the circuit breaker to “OFF”. During this time, the battery has to be charged according to the manual.
09 MAINTENANCE TIPS
Regular maintenance can enhance the service life and driving safety of the smart electric bike. Please refer to the following suggestions and take care of your scooter.
|
Item |
Purpose |
Rate |
|
Brake |
Check braking performance, prevent traffic accident due to braking malfunction |
Daily |
|
Tyre |
Check tyre damage & air pressure, prevent flat tyre or power overconsumption during driving |
Daily |
|
Rim |
Check rim strength & remove dirt in bearing, prevent rim breaking or jamming |
Weekly |
|
Shock absorber |
Check front & rear shock absorbers, remove dirt & maintain lubrication,prevent shock absorber jamming |
Weekly |
|
Ignition & throttle |
Check ignition & throttle, prevent jamming or occasional failure |
Weekly |
|
Wire |
Check wire connector loose or damage, prevent wire malfunction |
Weekly |
|
Screw |
Check screw connector loose or damage, prevent screw malfunction
|
Monthly |
|
Battery |
Check battery appearance & cell performance, prevent wire malfunction & lengthen lifespan |
Monthly |
|
Charger |
Check whether charger wire damage, braking, off-line, input & output connector complete and reliable or not |
Monthly |
|
Lubrication |
Check front wheel axle, brake need to add lubrication or not |
Monthly |
|
Cleaning |
Surface cleaning |
Monthly |
10 SMART APP INSTRUCTIONS
Step 1: Download Smart Vehicle APP Client Software
 Please scan QR code to download App.Also can download from APP Store or Play Store. (System requirements: iOS 9.0 / Android 6.0 or above)
Step 2: Binding smart vehicles
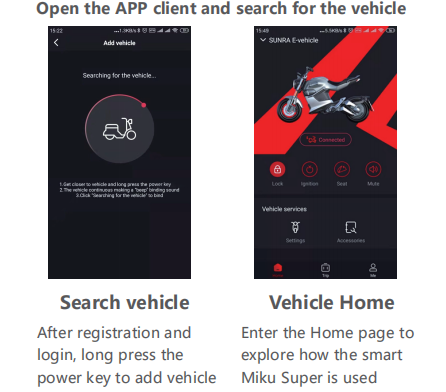 Note: Can't find or bind failed, please switch on/off phone's Bluetooth and try again.
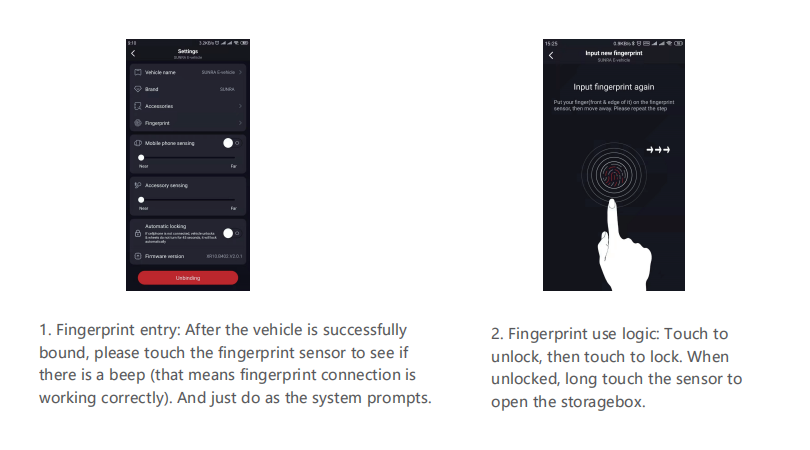
Step 3: Fingerprint function description
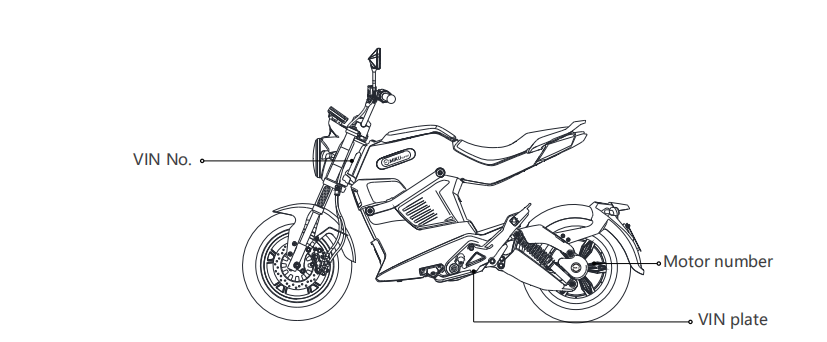
Serial No.:
-
The vehicle identification number(VIN) is required for all warranty work, theft recovery and consumer safety.
-
The complete VIN also appears on a plate at the bottom of chassis frame.
-
The VIN print is located at steering pipe of chassis frame.